Monday, December 19, 2011

Rum (no actually, Whiskey!) balls - recipes & pictorial

I finally got down to making my rumballs. Actually I used whiskey instead of rum....so technically, they are whiskey balls :P I promised some friends the recipe so here it is (it's more approximate than exact measurements):

Makes about 80-100 small whiskey balls -
9x13" chocolate cake (I used Duncan Hines Devil's cake 'cos it was on sale)
2 cups of ground almond
1 cup of heavy whipping cream
5 tablespoons of whiskey (I used Dewar's)
Chocolate rice for coating
Unsweetened shredded coconut for coating (I used Bob's Red Mill)

Make the cake by following the instructions on the cakemix box. Let it cool to room temperature and then crumble it up with your fingers. I actually made mine in 2 batches (1/2 cake and ingredients at a time) 'cos I don't have such a big mixing bowl.

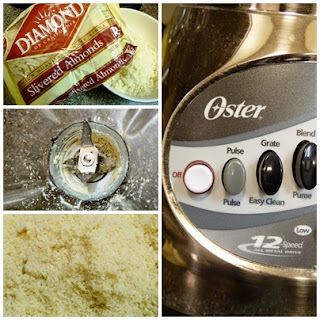
As I couldn't find ground almonds....I bought the slivered one and put them in the blender on grind/pulse functions to grind them to a powdery form.

It's simple to put the whiskey cake dough together - all you need to do is to add the cake crumbs, ground almond, heavy whipping cream & whiskey together and mix them well such that they all come together. Test the mixture for the right texture. I'd suggest to add the liquids in parts so that you don't end up with too wet a dough (just in case!). However, if the dough is too dry, add more liquids but go easy on the whiskey :P You can chill the dough in the refrigerator for about 20min or so if you wish to, so that the dough is less sticky (hence your work less messy later on).

While the dough is chilling, prepare the coatings for the whiskey balls. I used chocolate rice and shredded coconut...but feel free to use other things like powdered sugar, cocoa powder, nuts or crushed candies etc. I toasted the shredded coconut in a pan over the stove (medium heat). Keep stirring the coconut and watch it closely 'cos the shreds do get burned easily. When the coconut shreds start to turn golden and smell delicious...it's time to turn off the heat. I spread the chocolate rice and shredded coconut onto two separate cookie sheets.

Remove the whiskey ball dough from the refrigerator. I used a mini ice-cream scoop which made my job a whole lot easier. Scoop the dough and drop it on your palm. Use your two palms to roll the whiskey ball into a nice round shape. Then drop the whiskey ball into either of your coating ingredients and roll the ball to coat it nicely and set aside.

Here's how my whiskey balls look after being coated.

I wrapped the whiskey balls individually in red and gold foil. You can also just pop them into miniature cupcake liners. I bought some Christmas-theme tins from Michaels and filled them up with the little whiskey balls. I also added a note that lists the ingredients in case of food allergies.
Well...that's all for the whiskey ball making instructions. The little tins are all out to be delivered to RG's colleagues, neighbors and our helpful sanitation and postal workers today.

Friday, December 16, 2011

That darn flu.....

It's that time of the year again.....no, I don't mean the holiday seasons but FLU season!! I have been down with cough and flu for the past couple of days. Apart from the flu meds, I have been downing lots of 川貝枇杷膏 as well as hot ginger lemon tea.

I found these vit-C pops at TJMaxx last week for less than $5!! (retailing at Amazon for over $20) I've never had Vit-C that tastes so yummy. My friend from SG is visiting me in a couple of weeks time, I've asked her to bring over some Redoxon vita-immune....I think RG and I both need to put a good amount of Vit-C into our systems to fight the darn flu viruses.
Apart from the X'mas wreath....I haven't been able to hang up the xmas lights yet 'cos it has been cold out there and I'm not exactly in the best of shape to get out into the cold. I also haven't written/mailed out the xmas cards/presents or make chocolate truffles to be given away as xmas gifts to RG's colleagues and neighbors. I hope families & friends will understand if the presents/cards come a little late this year :P

Tuesday, December 13, 2011

If an apple a day keeps the doctor away....how about 5??! (Apple pie recipe and pictorial)

I've been down with flu yet again :( The flu meds make me drowsy and to keep myself awake and productive...I decided to bake an apple pie (seeing that I have 5 golden delicious apples tucked away in one corner of the refrigerator, forgotten and almost frozen solid!)

And since I'm baking...I may as well go all out to do a pictorial for my dear readers out there (hello??? *echo*).

So the key ingredients are: 5 golden delicious apples (or most would use granny smith) peeled/cored and cut into thin slices, a dash of ground nutmeg, 1 tsp ground cinnamon, 1 tbsp of vanilla extract, 1 tbsp corn starch, 1/2 cup white sugar, 2 tbsp flour, 1/2 cup light brown sugar, 1 cup unsalted butter, 2 tbsp of water and 2x9" pie crusts (I used ready made ones but you can go ahead and make your own if you are more ambitious).

So I usually start by placing the bottom pie crust in the pie dish and then arranging the apple slices as nicely as I can. Next, I melted the butter in a saucepan over the stove and stirred in the flour and corn starch to mix. Then I added in water, white and brown sugar and continue to stir till the mixture became a caramel consistency. Do allow the mixture to come to a slight boil and then reduce to simmer briefly.

I used a big spoon to slowly drizzle the caramel evenly over the apple slices until they were nicely coated. I left a couple tablespoons of caramel behind to be used as a glaze for the pie crust. I put the saucepan back onto the stove with the warmer function on so that the caramel doesn't get hardened. Using a pizza cutter, I cut the other pie crust into strips and made a lattice top for the pie. Then I used a pastry brush to glaze the lattice top with the remaining caramel.

Finally the pie went into the preheated oven (350F) for about an hour. I placed the pie in the middle rack and just below it, I placed a cookie sheet lined with aluminium foil to catch the sticky drips. At this point, your job is all done.....now sit back and smell the awesome fragrance of the pie baking in the oven! An hour later, you are ready to dig in with your fork!

Monday, December 12, 2011

Xmas decorations on a budget

So what's a gal got to do when she's on a tight budget for her xmas decorations? (A) She uses what she already has; (B) She buys cheap stuffs; (C) She gets her hands dirty or (D) All of the above.

So using what we already have.....a big beautiful Holly tree in the yard!

With a pair of pruning shears and a pair of thick gloves....I went about to trim off some twigs from the Holly tree.

And at Michaels yesterday, I had bought a wreath for less than $2 and a big red bow for $0.99. The cost of Holly leaves/berries - $0.00. 

Ta-da! My $2.99 x'mas wreath....not too shabby huh? Well, sometimes, simple is best....especially when budget is tight :P
And the remaining holly leaves/berries, I just bundled up the twigs and tied a ribbon around them for hanging as wall decorations around the house. That is......errrrmmm FREE!

Lil red mushroom on my finger....

Can't believe it took me so long to finally buy a tube of glue from Michaels to finish off the ring pin cushion that I had made eons ago! Lil red mushroom and adjustable ring got married together by some E-6000 and here's the finished product....

Tried it on....perfect fit of course (the ring is adjustable silly!).

My sewing box is getting wayyyyy out of hand.....I have been having great difficulties rummaging through all the STUFFS to find what I need....some organisation is obviously needed here.....

....and the solution, a hanging jewelry organizer from TJMaxx. Now everything is sorted neatly and in plain sight...what a JOY!

Sunday, December 11, 2011

Temperatures are dipping.....

The past weeks had been pretty warm, which was quite unusual. Finally the temperatures are dropping and it's starting to feel more like winter. Good thing however that on the northeastern coast, cold wintry days aren't dreary like in some other parts of the world. Like now, it looks sooooo sunny outside that you wouldn't be able to tell that it's cold unless you step out of the house. And it's the colder months when the sunrises and sunsets are particularly beautiful. Just the other day, I snapped this shot of the red fiery sky minutes before sunrise. It was most amazing! 

RG received his belated birthday present from his family...and it's an iPad2. I'm so jealous :P It even comes engraved with his name and favorite quote. It's the very first i-something in our household so that's a big deal!

Now apples aside....I found these weird looking dark brown tomatoes (called Kumatoes) at the supermarket. I don't really know what to do with them yet....will have to taste it first to see how best to eat them.

Got this big bottle of Earth Friendly hand soap for a great price at Ocean State Job Lot. It's not only gentle on the hands but good for the environment too. It's free of formaldehyde, petrochemicals, GMOs, phosphates, chlorine, ammonia and it's biodegradable and pH neutral. I'll re-bottle the hand soap into one of my foam pump ones to stretch my dollars even further :P 

RG needed a document bag to hold his stacks of paper.....so I made him a simple fabric tote using this beautiful map fabric that I had bought awhile ago on etsy. He loves maps too so I figured it'd be a great fabric for him.

Tuesday, December 6, 2011

Upcycled map of NEW YORK cosmetic pouch

I'm kind of a travel brochures/maps hoarder. Wherever we travel to....we'll pick up tonnes of them. As my stash continues to grow at exponential speed....I was thinking hard if I could use the beautiful brochures/maps for anything else before resorting to dump some of them out with tomorrow's recyclables. And since I managed to make some cute stuffs out of candy and chips wrappers....I thought why not do the same with the brochures/maps. So here's my upcycled creation for today....I'm actually quite pleased with how it turned out. I mean...I love sewing and I love maps...and there's nothing more enjoyable and fulfiling than to combine these two of my loves. Now my cosmetics have a new home - and a darn cool one I'll say!


Monday, December 5, 2011

Refashioning - The 10-minute neck warmer

My friend JA showed me some lovely neck warmers online. Call me a moutain tortoise when it comes to winter fashion but I haven't really thought of using anything else apart from a regular scarf to keep my neck warm. JA has opened my eyes to many fashionable possibilities! And I do like the idea of a wearable neck warmer instead of having to twirl the long scarf round and round my neck which could get a little uncomfortable sometimes and not to mention irritating too when the hanging ends end up in all the wrong places like in my hot soup or worse - between the elevator doors!

So today, having a little time to spare, I set out to make myself a new neck warmer - using my old $2 fleece scarf. Nothing elaborate I told myself....I want something that's easy and fast to make and pretty too! 

This tutorial is gonna be so easy and quick I promise.

Step 1 - Fold the scarf lengthwise in 2 (right side facing) and pin the 2 edges together.
Step 2 - Machine stitch the 2 edges and remove pins.
Step 3 - Stick your hand into the scarf from the opening (where the frillies are).
Step 4 - Flip the scarf to the right side.  


Step 5 - Wrap the sewn scarf around your neck and determine where to place the button and then sew the button in place.
Step 6 - Where the scarf end is supposed to meet at the button, make a knot using the frillies and remember to leave enough space for the button to get through.


Step 7 - Wear and flaunt your new neck warmer that you've completed in less than 10 minutes!